Bit By Bit, the Beast Comes Back To LIFE!!!
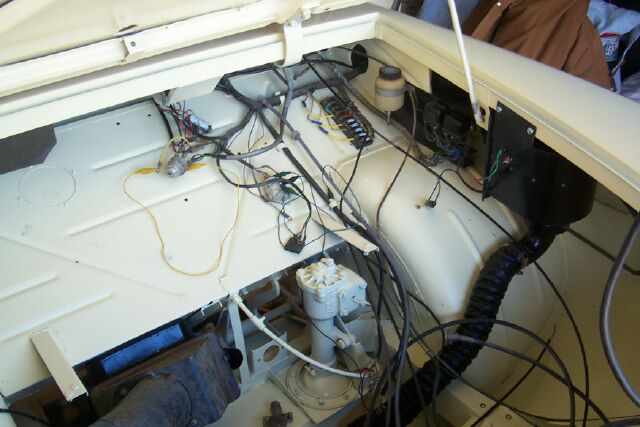
Sorry about the delay in getting an update out! It has been busy
at work and at home. Plus, I have been doing a lot of work on the
wiring, and that does not make for very exciting pictures! Here we
see the status under the hood. The bilge blower is up and running,
as is the heater motor, wipers, reversing lights (Thanks Jambone!),
rear turn signals and brake lights. Still to come are the front turn signals,
horn and marine lights. As you can tell, I am hot wiring the ignition
switch, as the key is missing. Took me a while to get all this stuff working,
as I was kinda flying blind. I had some usefull pictures, and the wiring
diagram, but just the same, it was kinda weird having to get the bilge
blower realys working before anything else would work! Alas, my vacuum
tube appears inoperative, so it is a push-button car!
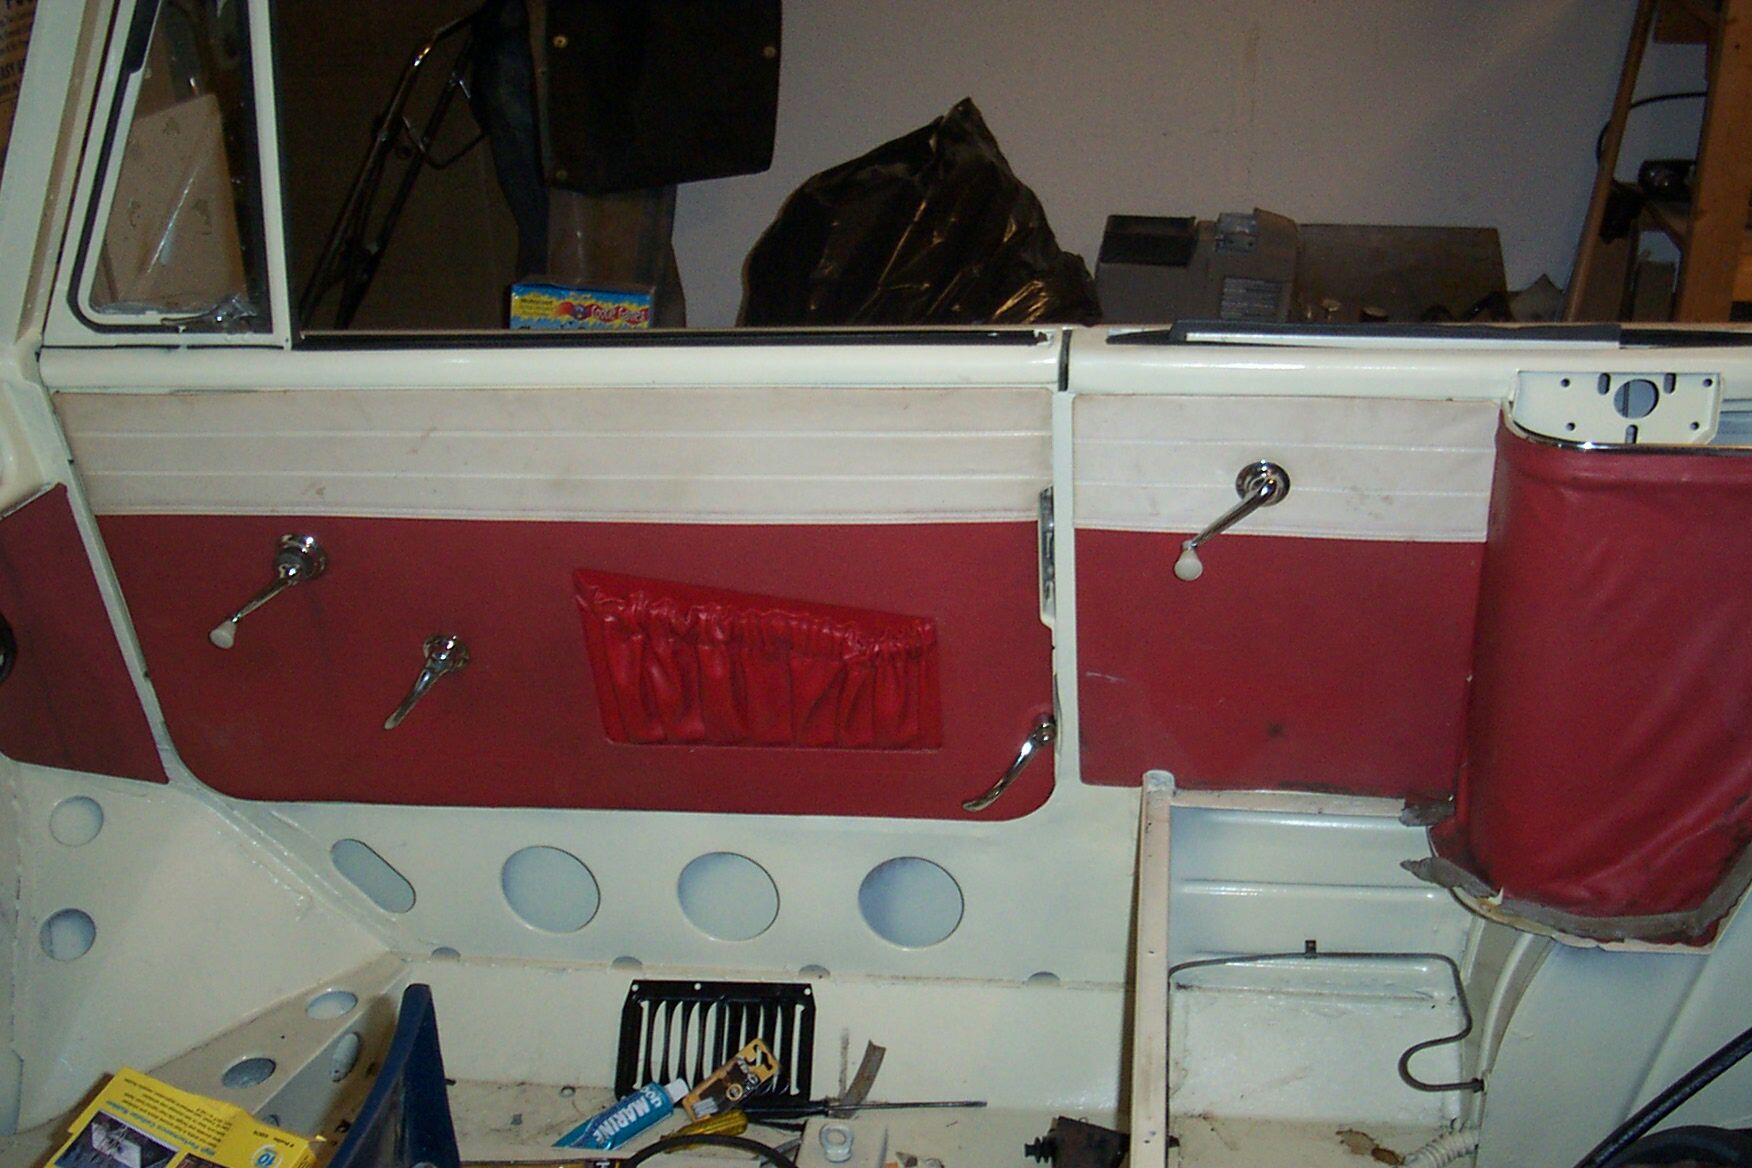
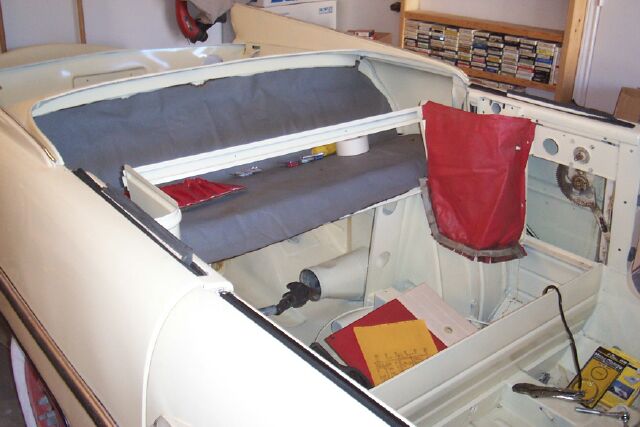 Here we see the status of the inside of the car. The original gray vinyl
cleaned up nicely (no idea what was on it, but it was gross!), so
it is going back in. Also, as promised, you can see that all the door
fuzzies are in. Moss Motors sells them for 10 bucks each or so, and
you just cut them down to size!
Here we see the status of the inside of the car. The original gray vinyl
cleaned up nicely (no idea what was on it, but it was gross!), so
it is going back in. Also, as promised, you can see that all the door
fuzzies are in. Moss Motors sells them for 10 bucks each or so, and
you just cut them down to size! 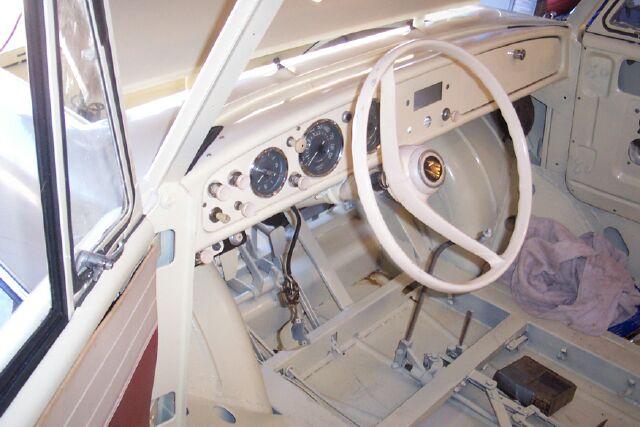 And here we see the dash! All the instruments appear to be
working OK, but some of the lights are not. Pretty cool seeing my
prop light come on! I need a new handle for my dash gas pedal, but
that can wait until later. Also, I found my glove box lock! Woohoo!!
Of course, it was wrapped in petrified masking tape. The hood locks are
on as well, and the floorboard is painted. Very soon it will be time for
brakes, whell seals and putting the engine together!!
And here we see the dash! All the instruments appear to be
working OK, but some of the lights are not. Pretty cool seeing my
prop light come on! I need a new handle for my dash gas pedal, but
that can wait until later. Also, I found my glove box lock! Woohoo!!
Of course, it was wrapped in petrified masking tape. The hood locks are
on as well, and the floorboard is painted. Very soon it will be time for
brakes, whell seals and putting the engine together!!
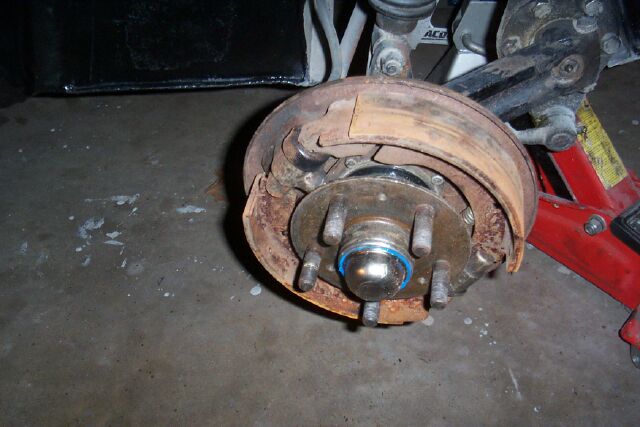 Ok, this update has been long in coming. I had to replace the
clutch on my Spitfire, suffer through a week of illness, and cold weather.
But, work has been renewed! Here we see the left side of the front suspension.
A new seal has been installed, the bearings greased up, and the brake
shoes installed. This was a much easier job than expected. Fortunately,
the cylinders were in excellent shape, as are the shoes and the brake
lines. I went down to Sportscar Warehouse, and bought three boxes of cylinder
rebuild kits for 6 bucks each. The three of them are enough to redo all the
cylinders. After putting it all together, I tested out the brakes with compressed
air, and they worked fine. Hopefully no leaks when they are bled out! I replaced
the the nasty rubber dust covers with metal ones. I had to modify them a
bit to make them snug up, but with a little silicon sealer on there, they
are water tight! I thought about painting everything, but decided that since
the chance of a leak when I bleed them out the first time is pretty high,
and that will ruin the paint, why bother!
Ok, this update has been long in coming. I had to replace the
clutch on my Spitfire, suffer through a week of illness, and cold weather.
But, work has been renewed! Here we see the left side of the front suspension.
A new seal has been installed, the bearings greased up, and the brake
shoes installed. This was a much easier job than expected. Fortunately,
the cylinders were in excellent shape, as are the shoes and the brake
lines. I went down to Sportscar Warehouse, and bought three boxes of cylinder
rebuild kits for 6 bucks each. The three of them are enough to redo all the
cylinders. After putting it all together, I tested out the brakes with compressed
air, and they worked fine. Hopefully no leaks when they are bled out! I replaced
the the nasty rubber dust covers with metal ones. I had to modify them a
bit to make them snug up, but with a little silicon sealer on there, they
are water tight! I thought about painting everything, but decided that since
the chance of a leak when I bleed them out the first time is pretty high,
and that will ruin the paint, why bother! 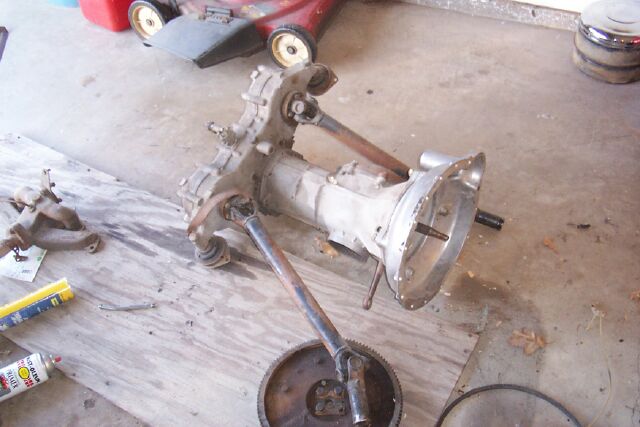 Engine and tranny time! Supposedly the tranny is solid, and
that does appear to be the case. I was pleased to find the back up switch
on it, and all the linkages. Yea! You can see the flywheel in the foreground.
The ring gear on it is shot, but a nice one was included. Guess I will
have to borrow the wife's oven for a little while. Quick paint job on
the axles, new mounts, and we are off!
Engine and tranny time! Supposedly the tranny is solid, and
that does appear to be the case. I was pleased to find the back up switch
on it, and all the linkages. Yea! You can see the flywheel in the foreground.
The ring gear on it is shot, but a nice one was included. Guess I will
have to borrow the wife's oven for a little while. Quick paint job on
the axles, new mounts, and we are off! Amazingly, these are all the parts left to be installed. Very
little. Just as an aside, a dimmer switch for a 47-mid-fifties Jeep
is an exact replacememt for the Amphicar. I will post the BW# later.
Amazingly, these are all the parts left to be installed. Very
little. Just as an aside, a dimmer switch for a 47-mid-fifties Jeep
is an exact replacememt for the Amphicar. I will post the BW# later.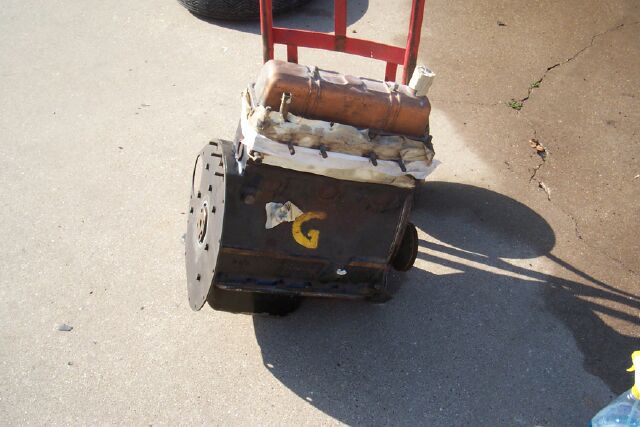 Here is the big G! Supposedly rebuilt, and from the new seals
and gaskets on it, I would say that is a distinct possibility. I am
going to paint it, and start putting all the accessories on it. The car
came with gasket sets and new plugs and the like, so this should go fast.
I have had the radiator rebuilt, and I am going to paint the housing for
it.
Here is the big G! Supposedly rebuilt, and from the new seals
and gaskets on it, I would say that is a distinct possibility. I am
going to paint it, and start putting all the accessories on it. The car
came with gasket sets and new plugs and the like, so this should go fast.
I have had the radiator rebuilt, and I am going to paint the housing for
it.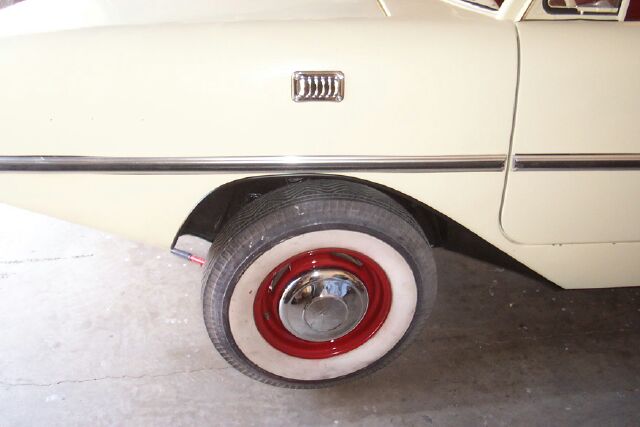 Just had to show off my freshly painted front wheel, and the
rechromed hubcap. While I was at it, I cleaned and painted up
under the wheel well. Still need to put on my Amphicar logos though!
Just had to show off my freshly painted front wheel, and the
rechromed hubcap. While I was at it, I cleaned and painted up
under the wheel well. Still need to put on my Amphicar logos though!
 Well, here it is. I really need to go after the panels with a
good cleaner, but that can wait. Sorry about the mess on the floor!
I had the back seat in, but I took it out for the engine install. I had
ALL of the wrinkles out of that back interior piece, and after a couple
of days, they all came back! Grrr....
Well, here it is. I really need to go after the panels with a
good cleaner, but that can wait. Sorry about the mess on the floor!
I had the back seat in, but I took it out for the engine install. I had
ALL of the wrinkles out of that back interior piece, and after a couple
of days, they all came back! Grrr....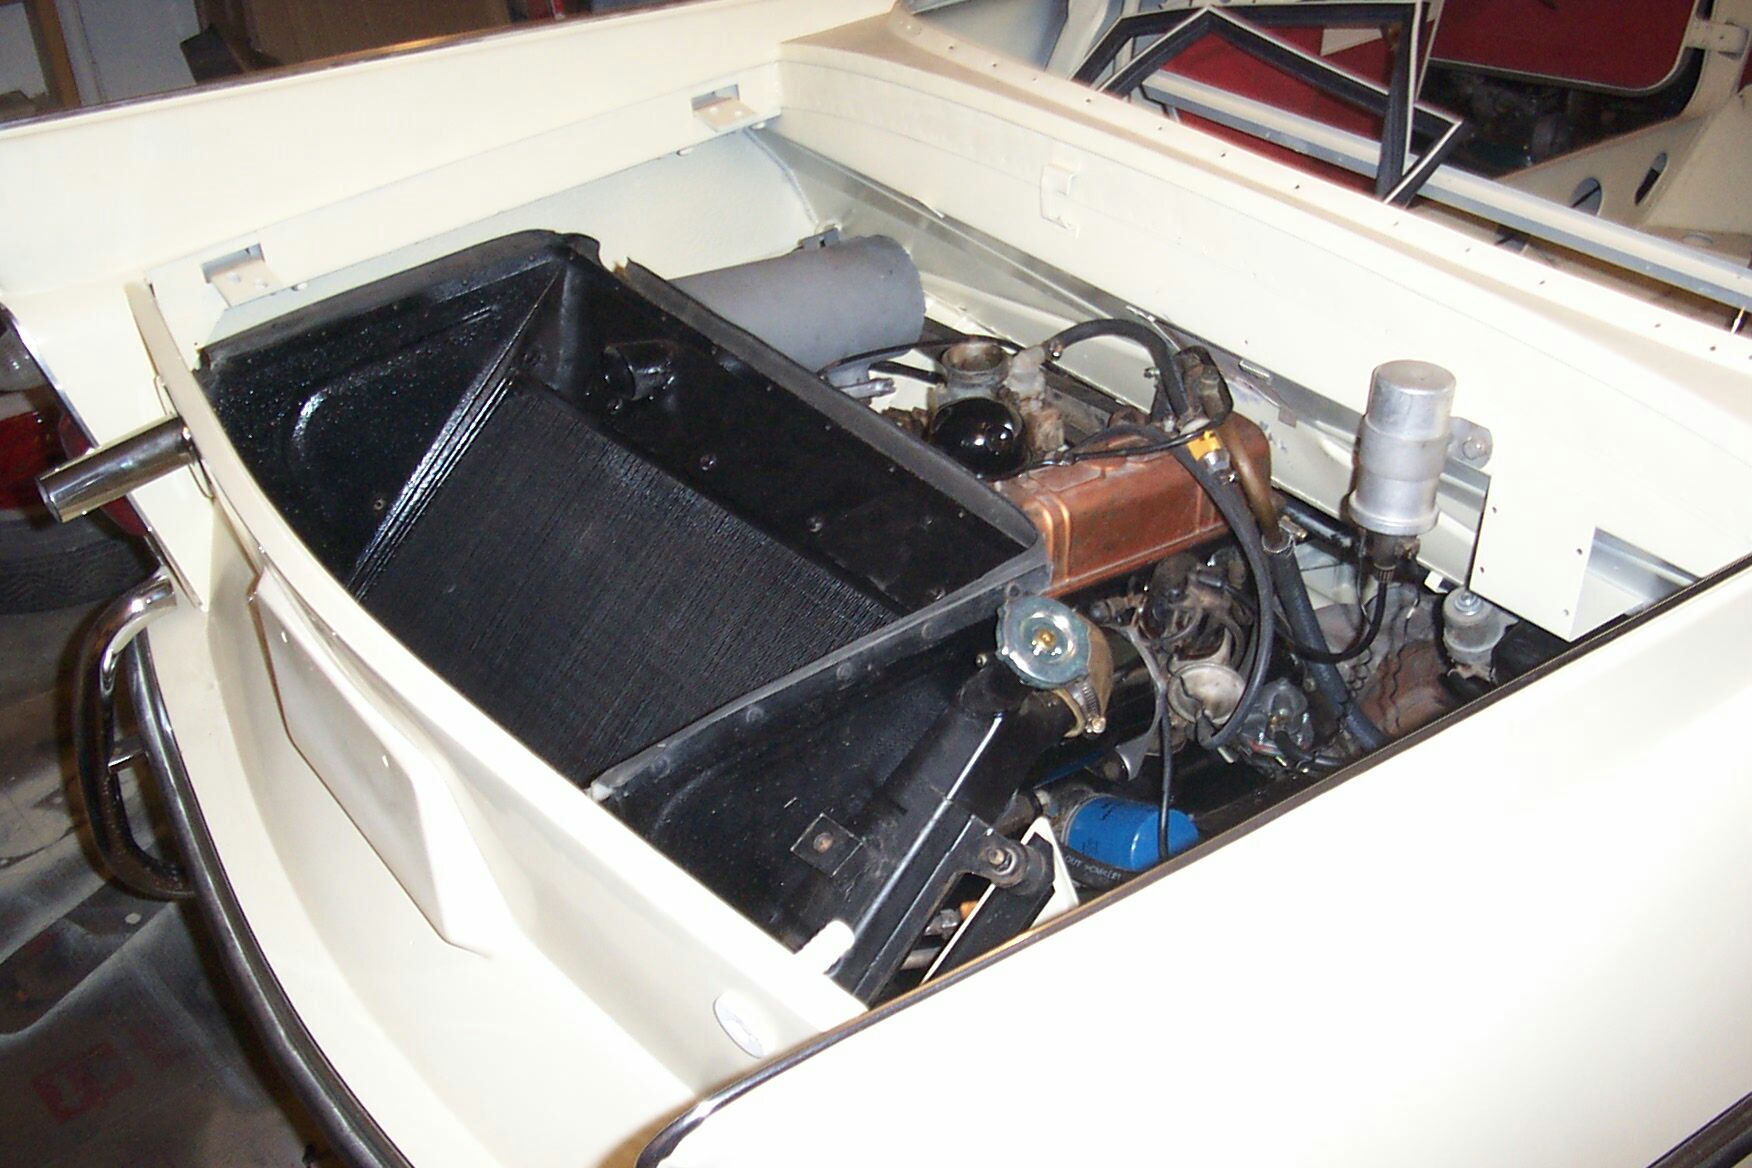 I am pretty proud of this one! My buddy Brian and I got the engine
in in just a couple of hours. It then took me twice as long to get the
axles in! Getting it started was a little tricky. Until I got the distributor
gear lined up, I was getting some horrific backfires! One of them almost
gave the dog a heart attack! It is running very nicely now. Turns out that
my accel cable was busted, so a new one is on order. I was able to cut
the brackets off of the old muffler, and weld them to the new one. Not
the prettiest job, but I like it a lot better than trying to fabricate
straps.
I am pretty proud of this one! My buddy Brian and I got the engine
in in just a couple of hours. It then took me twice as long to get the
axles in! Getting it started was a little tricky. Until I got the distributor
gear lined up, I was getting some horrific backfires! One of them almost
gave the dog a heart attack! It is running very nicely now. Turns out that
my accel cable was busted, so a new one is on order. I was able to cut
the brackets off of the old muffler, and weld them to the new one. Not
the prettiest job, but I like it a lot better than trying to fabricate
straps. 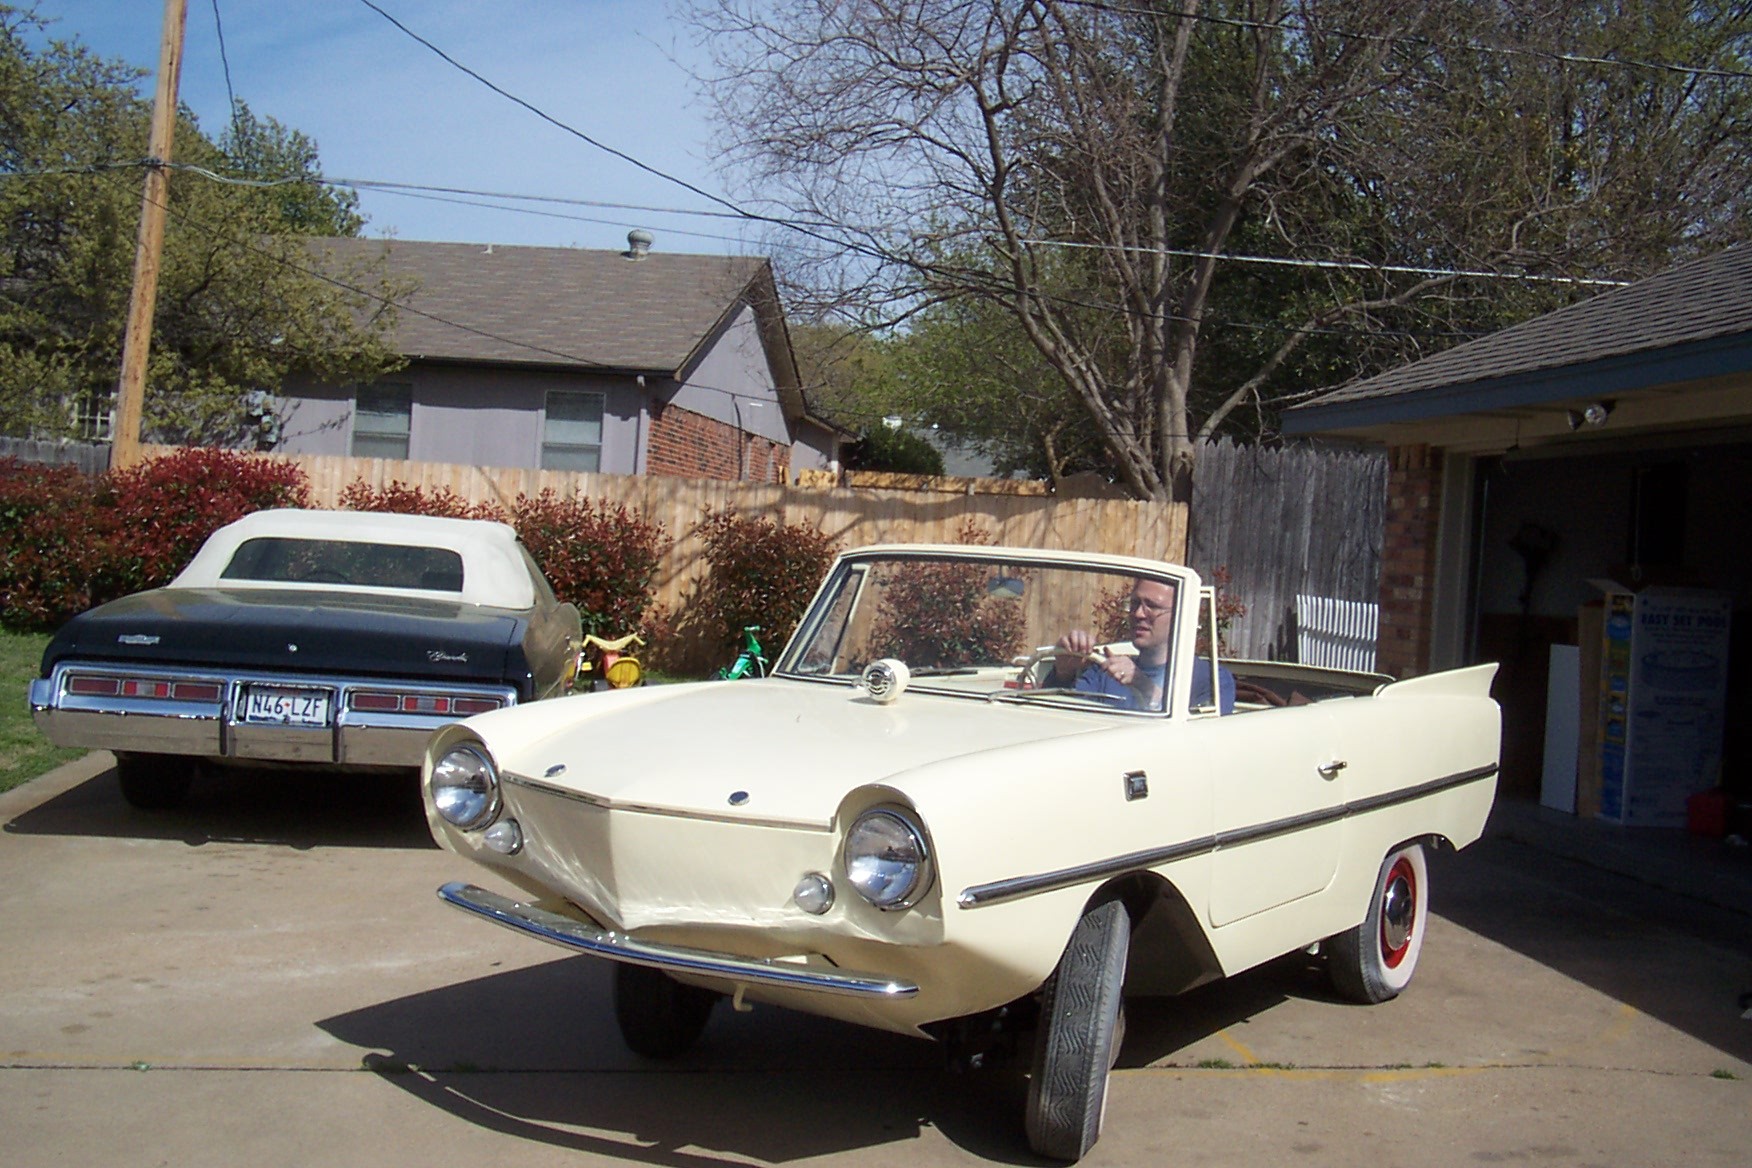 Here I am taking it out on it's first drive out of the garage area.
Pretty exciting!! Will the clutch work? Gas pedal stick? Rear wheels
fall off? Engine blow up? 5+ months of work encapsulated at this moment!
Here I am taking it out on it's first drive out of the garage area.
Pretty exciting!! Will the clutch work? Gas pedal stick? Rear wheels
fall off? Engine blow up? 5+ months of work encapsulated at this moment!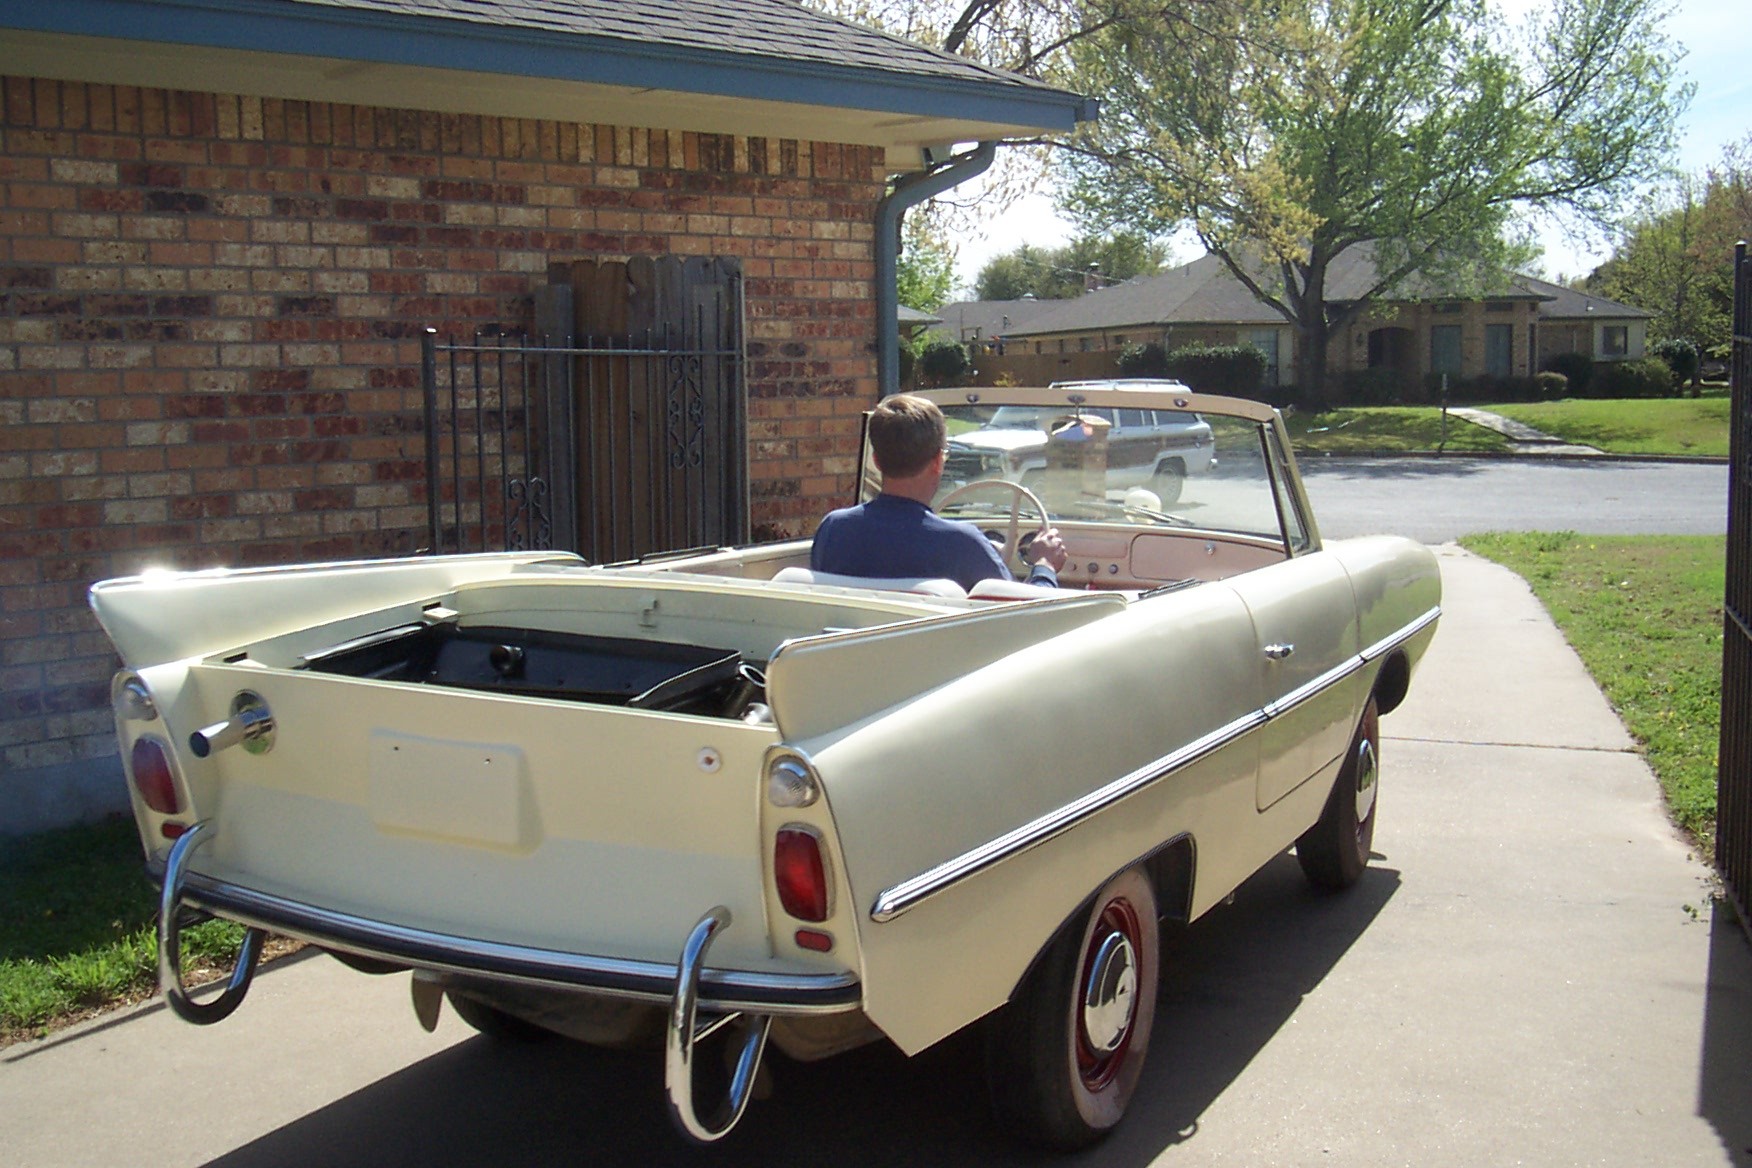 Heading out...man, I was pumped! You can see a little oil smoke
coming out of the exhaust. Guess it still needs to break in. Engine sounds
good though. Except for the hubcap falling off, the first few test drives
went well. The big problem was the carbie. I had rebuilt it, and it kept
flooding. After fooling with it for a few days, I discovered that the
problem was the replacement fuel valve was a shade shorter than the original.
As a result, the float could not close it. Replacing it with the original
one fixed that problem up.
Heading out...man, I was pumped! You can see a little oil smoke
coming out of the exhaust. Guess it still needs to break in. Engine sounds
good though. Except for the hubcap falling off, the first few test drives
went well. The big problem was the carbie. I had rebuilt it, and it kept
flooding. After fooling with it for a few days, I discovered that the
problem was the replacement fuel valve was a shade shorter than the original.
As a result, the float could not close it. Replacing it with the original
one fixed that problem up. 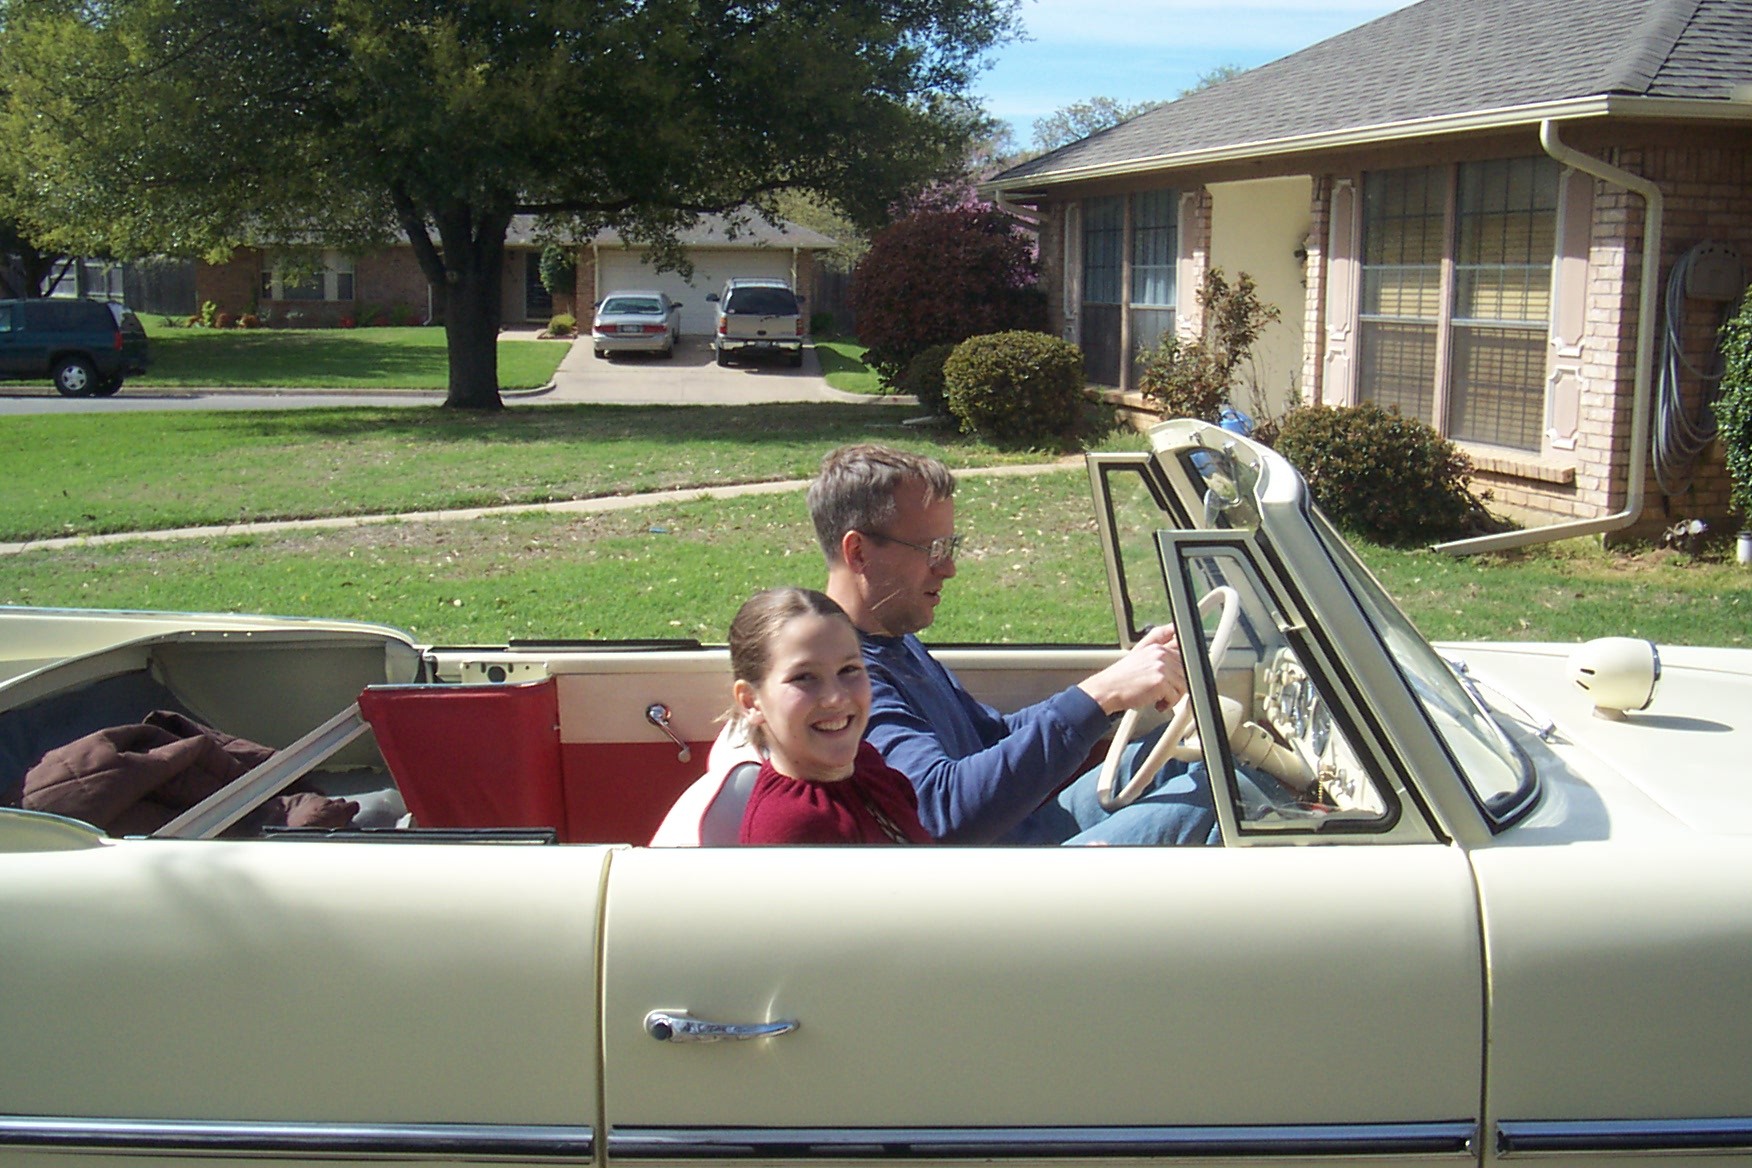 After the original test drive or two, I took the kiddos for a test
cruise. Here I am blasting away on the horn with my daughter Mary.
After the original test drive or two, I took the kiddos for a test
cruise. Here I am blasting away on the horn with my daughter Mary.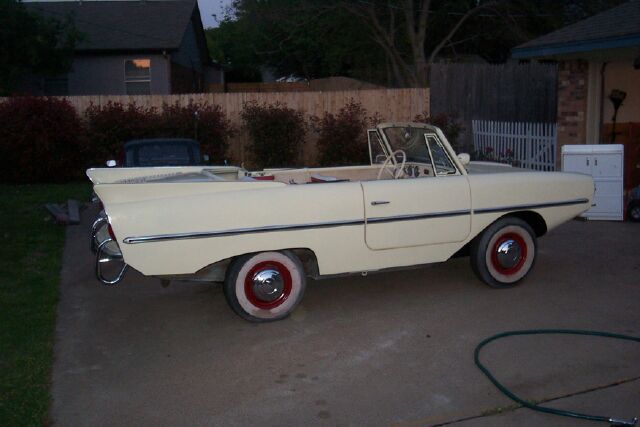 I took these tonight after Kathy and I got the deck lid on. Look...it
is an almost complete Amphicar!
I took these tonight after Kathy and I got the deck lid on. Look...it
is an almost complete Amphicar!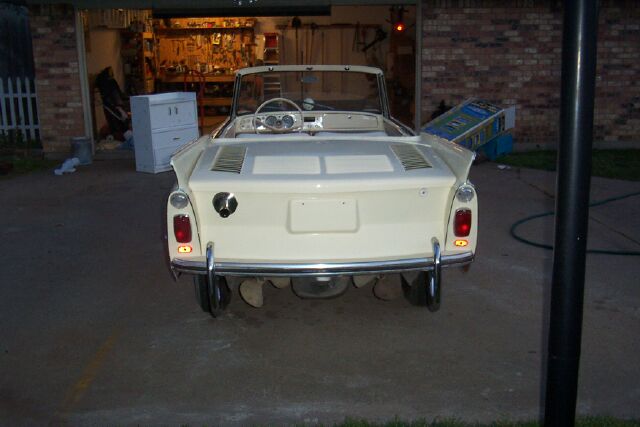 From the rear. The neighbors got quite a kick out of me showing
the props off! Now it is time to address the hundred small issues, get
it really road legal, and thoroughly shake it down. It is on the road
at the beginning of Spring...it will be on the lake by the end!
From the rear. The neighbors got quite a kick out of me showing
the props off! Now it is time to address the hundred small issues, get
it really road legal, and thoroughly shake it down. It is on the road
at the beginning of Spring...it will be on the lake by the end!
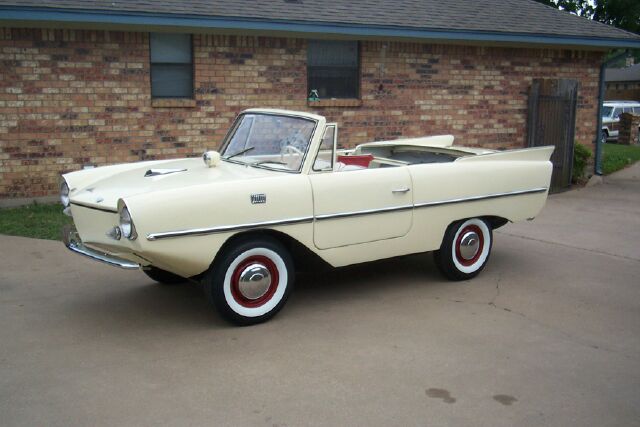 Only one new picture this time, but it a beaut! Just got my new BF Goodrich
wide whites from Discount Tire installed. Doesn't the car look spiffy? I
have also installed the front marine light. As soon as the insurance card
shows up for it, I am going to brave driving it down for inspection, and
then plates.
Only one new picture this time, but it a beaut! Just got my new BF Goodrich
wide whites from Discount Tire installed. Doesn't the car look spiffy? I
have also installed the front marine light. As soon as the insurance card
shows up for it, I am going to brave driving it down for inspection, and
then plates.
 YES!!!! I finally worked up the gumption, and drove it to the lake. I was
hoping for a quick in and put trip, but instead we ended up with about 30
people watching Amphi take it's maiden voyage since being rebuilt. I actually
felt pretty confident as I approached the lake, and then...in I went! I had
the floorboard and the rear seat out, and I was watching for leaks! I shipped
in a little in the front, and a small dribble from the passengers door, but
nothing major at all. What a rush it was to realize that the car was FLOATING,
and then I engaged the props. It was so cool, I am still grinning from the
experience. Man, were the people taking pictures and cheering, and woo-hooing!
Thank goodness it did not conk out on me!
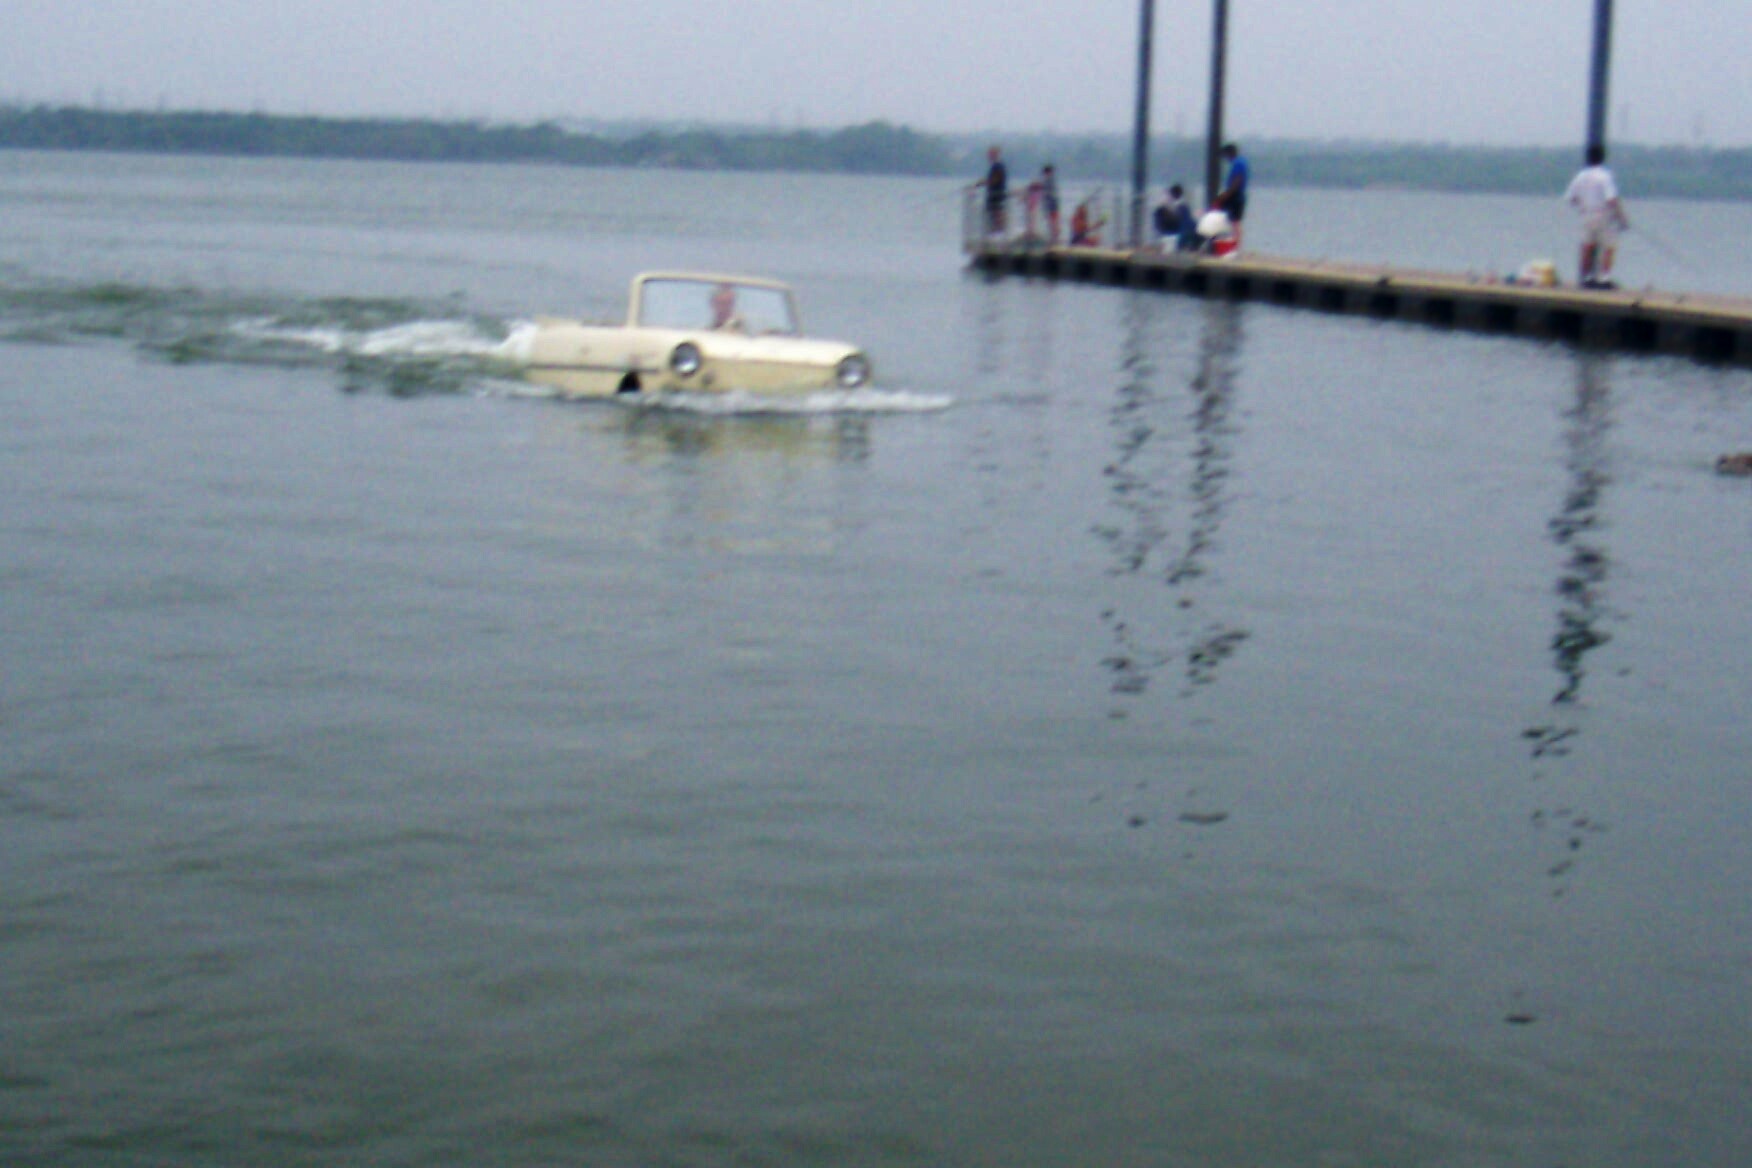
YES!!!! I finally worked up the gumption, and drove it to the lake. I was
hoping for a quick in and put trip, but instead we ended up with about 30
people watching Amphi take it's maiden voyage since being rebuilt. I actually
felt pretty confident as I approached the lake, and then...in I went! I had
the floorboard and the rear seat out, and I was watching for leaks! I shipped
in a little in the front, and a small dribble from the passengers door, but
nothing major at all. What a rush it was to realize that the car was FLOATING,
and then I engaged the props. It was so cool, I am still grinning from the
experience. Man, were the people taking pictures and cheering, and woo-hooing!
Thank goodness it did not conk out on me! More pages to come!
Odometer reading: 